Dust on film and prints is a common issue when scanning, but Photoshop’s Dust & Scratches filter offers a simple solution for eliminating it from your photos.


Dust is a persistent problem for photographers, as even tiny particles can create unwanted marks. These marks appear as black specks on images captured by film or sensors, and as white specks when scanning prints. While Photoshop’s Healing Brush and Spot Healing Brush are effective for removing dust, such as on a jacket in a portrait or on objects in a still life, this retouching process is time-consuming.
The Enduring Legacy of the Dust & Scratches Filter
Introduced in 1994 with Photoshop version 3.0, the Dust & Scratches filter has historically been a crucial tool for image correction. Its primary purpose was to address imperfections —such as dust, scratches, and tear— common in scanned prints and films, which were the predominant sources of digital images at the time.
Categorized under Filter > Noise, the filter’s placement reflects its function: it targets significant discontinuities (like dust and scratches) within areas that otherwise exhibit low discontinuity or flatness.
In many instances, this filter significantly expedites the often tedious task of image clean-up.

Dust & Scratches Filter: Understanding Radius and Threshold
The Dust & Scratches filter in Photoshop identifies dust and scratches as areas that differ significantly from surrounding pixel values. It then uses these neighboring pixel values to seamlessly fill in these discontinuities. The filter’s effectiveness is controlled by two key sliders:
- Radius: This setting defines the area of pixels around the detected dust or scratch that the filter considers.
- Threshold: This determines the intensity of the noise reduction applied by the filter.
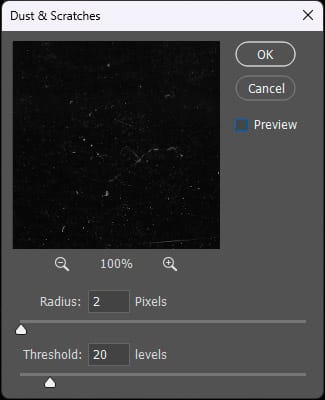

By checking the Preview, the effect of the filter is immediately visible.
Cursor Settings for Image Detail and Noise Reduction
To maintain image detail, a small radius is recommended, typically between 2 and 5 pixels (on a scale of 1 to 500). The threshold controls noise reduction by determining how dissimilar pixels are removed. To preserve image detail, the threshold should be set as high as possible, usually between 20 and 40 levels (on a scale of 0 to 255). A threshold of 255 has no effect.


The Anti-Dust filter’s effectiveness hinges on striking the right balance between radius and threshold.
The threshold is determined by the size of dust particles and the image’s weight. For larger images, a greater radius can be applied without risking detail loss from excessive smoothing. For instance, a 2400 dpi scan of a print or film needs a 4-pixel radius, while a 1200 dpi scan requires only a 2-pixel radius; in both cases, a threshold of 20 levels is maintained.
Beyond scans, this filter can mitigate noise in digital images, particularly at higher ISO settings where white dots, resembling dead pixels, may appear on dark backgrounds.
Duplicate the Background Layer
Some precautions are necessary with Dust & Scratches to avoid its sometimes destructive effects. It is better to work on a layer than on the background image. This layer is obtained by copying the background. Then, to return to the desired filter slider settings, this layer is converted for dynamic filters. By adding a mask to the layer, it is still possible to apply the Dust & Scratches tool only to specific areas. Finally, two Dust & Scratches layers can be generated, each with different settings and a mask, established according to the size of the dust and scratches.

Converting for Smart Filters
Converting a layer for Smart Filters allows for modifications to be made to the filter at any point after its initial application.

Refining with a Mask
Applying the filter across the entire image can lead to unwanted effects, especially at a radius of 3 pixels or higher. To counteract this, add a mask to the layer (Layer > Layer Mask > Reveal All). This enables you to undo the filter’s applied changes.

Retouching Layer: Dealing with Dust and Scratches
While the Dust & Scratches filter can be helpful, it rarely removes all imperfections on a single layer.
Often, a second layer with adjusted radius and threshold settings can improve results.
However, for persistent issues, it’s usually necessary to add a new layer (Layer > New > Layer) for traditional retouching using the Healing Brush or Spot Healing Brush tool.

Dust & Scratches vs. AI: A Comparison
Can Photoshop’s venerable 30-year-old Dust & Scratches technique stand up against modern AI? While Topaz Photo AI’s beta includes a dust reduction feature, its performance has been unconvincing so far, at least with our test file. The inherent graininess of the silver halide process, unfortunately, gets smoothed out, as the AI appears to misinterpret it as a flaw.

Discover the professional photography courses at Spéos
Spéos photography school offers professional photography programs in 1 year, in 2 years, short photography programs (in 2 months and in 5 months), as well as photography workshops.
The long courses to become professional photographers allow you not only to master all the photographic techniques and its vocabulary (blurs, hyperfocus, sharpness zone, depth of field, backlighting, focal length, shutter release, autofocus, wide-angle, rule of thirds, etc.), but also all the stages of shooting and image processing.
Visiting the school allows you to discover the premises, the studios and the equipment, and is undoubtedly the best way to familiarize yourself with your future way of working. This is why, in addition to the open days, Spéos offers throughout the year personalized visits by appointment to come and discover the school with a member of the team.
Text and photos: Philippe Bachelier, teacher of Printing techniques at Spéos