Digital photography is often plagued by Moiré, an effect that introduces undesirable, colored, wavy patterns into images. The question is: how can we fix this?

Camera specifications often mention the anti-aliasing filter. This filter is situated in front of the sensor and is designed to minimize aliasing and moiré effects in the resulting image. It operates by filtering out high-frequency signals, which are the very finest details of the photographed scene.
Because of this high-frequency cutoff, the anti-aliasing filter causes a minor reduction in image resolution. Consequently, some camera manufacturers choose to omit it. Examples include Fujifilm, with its X-Trans sensors, and manufacturers offering cameras featuring a pixel-shift function.


A camera sensor, such as the one in the Nikon Z8, is an array of photosites. Most sensors employ a Bayer pattern, which uses RGB filters over these photosites. The final image pixels are generated after a process called demosaicing. To mitigate the risk of moiré patterns, an anti-aliasing filter is sometimes applied to the sensor, in addition to UV and infrared filters. However, high-pixel-density sensors, like the 45 MP sensor in the Nikon Z8, typically omit the anti-aliasing filter. This is because their high resolution inherently makes them less susceptible to moiré.
A matter of sampling
Moiré patterns, characterized by colored sinusoidal waves, are sometimes observed on woven materials like fabric. Their formation is linked to the fundamental structure of a digital sensor.
A sensor is an array of photosites, with each photosite contributing one pixel to the final image.
This pixel acts as the sampling unit. The distance between the centers of adjacent pixels is called the pixel pitch. Critically, a smaller pixel pitch corresponds to a higher spatial sampling frequency. For instance, a 45 MP (megapixels) full-frame (24×36) sensor will have a smaller pixel pitch—and thus higher spatial sampling frequency—than a 24 MP sensor of the same format.
To accurately capture fine detail, like alternating black and white lines, a sensor needs a sampling rate of at least two pixels—one for the black line and one for the white. When the detail is wider than two pixels, it is perfectly reproduced. However, if the detail is narrower than a single pixel, the sensor cannot resolve the individual lines. Instead, it averages the light values, which results in either a solid gray tone or sometimes colored, wavy patterns (sinusoids). This phenomenon is called aliasing.

The moiré effect is readily visible, for instance, on an open-weave fabric like that of this folding chair.
When two layers of the fabric overlap, the superimposition of the geometric patterns generates sinusoidal lines.
The Nyquist–Shannon sampling theorem
To avoid aliasing, the sampling frequency of a signal must be at least twice the highest frequency present in the input signal, as demonstrated by the Nyquist–Shannon sampling theorem (named after American scientists Harry Nyquist and Claude Shannon). The input signal’s frequency corresponds to the fine details of a scene, such as the weave of a fabric or the intricacies of architectural elements.
Aliasing derives from the Latin alias, meaning otherwise or in other words. It is important to note that the moiré effect does not occur in film photography because the photosensitive crystals in an emulsion are randomly distributed, rather than arranged in a geometric pattern.

The detailed nature of the leaves and flowers on this chestnut tree prevents the formation of moiré, as their patterns are organic and lack the repetitive geometric structure of the camera sensor’s grid. Consequently, there is no risk of moiré in this photograph. (Nikon D850, 85mm lens.)
Avoiding moiré patterns when shooting
Moiré patterns are caused by the close alignment of the subject’s grid lines with the sensor’s.
To eliminate moiré, you can adjust the image’s magnification by moving closer to or further away from the subject. A slight rotation of the camera can also be effective, preventing the subject’s pattern from overlapping the sensor’s (similar to pattern alignment in offset printing).
The risk of moiré is reduced when using a lens with low or medium resolution. Interestingly, a high-resolution lens stopped down significantly can also cause a similar effect due to diffraction.
The open-weave canvas exhibits a visible texture at short to medium range. No moiré interference patterns were detected. The image was captured with an Olympus OM-D E-M1 Mark II camera body, which lacks an anti-aliasing filter.


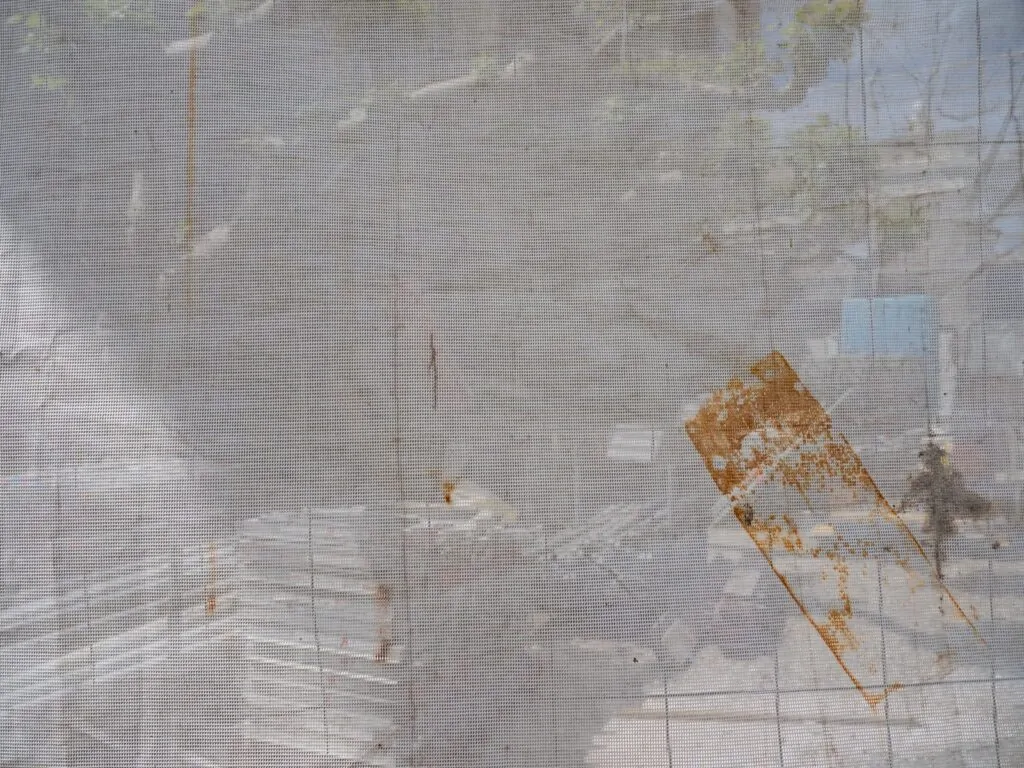
Moiré patterns become visible as the camera is moved away from the tarp. This occurs when the geometric pattern of the tarp, captured by the lens (using the 12–45 mm zoom at a 12 mm focal length), aligns with the structure of the camera’s sensor. When the image is viewed at 100% magnification on a monitor, these moiré effects are apparent in multiple areas, as demonstrated in the cropped detail of the image.


As you move further away from the tarp, the moiré pattern disappears.
Moiré correction in post-production
In post-production, moiré is corrected using software. Lightroom and Capture One offer moiré removal tools that have improved over time. Correction remains a manual and localized process.
No automatic correction is available. In Lightroom, the moiré reduction feature is part of the local adjustment tools, such as the brush. In Capture One, it is located in the Refine tab.
If the image is open in Photoshop, moiré correction can be applied using the Camera Raw filter (Filter > Camera Raw). This filter has the same settings as Lightroom’s Develop module, but in a different interface. Another technique, usable with Photoshop, involves creating a layer set to Color blending mode, and painting with a brush on this layer using a hue sampled from a color adjacent to the moiré areas. Its drawback is that it often leaves luminance moiré, visible as a pattern that is more or less dark.


In Lightroom, the moiré correction tool is located in the Local Adjustments menu, under the Details tab. Use the brush to select the area you want to adjust, then move the slider toward the positive values (to the right) until the moiré disappears.


In Capture One, the Refine tab reduces moiré using two sliders: Amount and Pattern. As you gradually adjust both sliders, the moiré disappears. Pattern specifically targets luminance moiré and its sinusoidal patterns, which vary in darkness.

To simplify the removal of moiré patterns, use an adjustment layer set to the “Color” blending mode. With the brush tool, you can paint over the colored fringes. To do this, first sample a color from the image area outside the fringes (like the gray of the shirt). On a Mac, hold the Option key while clicking to sample the color; on a PC, use the Alt key.
Discover the professional photography courses at Spéos
Spéos photography school offers professional photography programs in 1 year, in 2 years, short photography programs (in 2 months and in 5 months), as well as photography workshops.
The long courses to become professional photographers allow you not only to master all the photographic techniques and its vocabulary (blurs, hyperfocus, sharpness zone, depth of field, backlighting, focal length, shutter release, autofocus, wide-angle, rule of thirds, etc.), but also all the stages of shooting and image processing.
Visiting the school allows you to discover the premises, the studios and the equipment, and is undoubtedly the best way to familiarize yourself with your future way of working. This is why, in addition to the open days, Spéos offers throughout the year personalized visits by appointment to come and discover the school with a member of the team.
Text and photos: Philippe Bachelier, teacher of Printing techniques at Spéos